Showing posts with label thank you. Show all posts

Friday, November 25, 2011

Greeting Cards

So I like to do crafts and I'm on a budget.
With Christmas around the corner you all know that means it's time to start hand making some Christmas gifts.
I've only just begun, but I plan on making  a big pile of greeting cards for my mom and my mother-in-law. They have previously received these for Christmas and loved them.

I want to do a few intricate cards and a bunch of cards that are a little simpler. I started with simple. I've made two or three copies of 4 different cards so far.

 Many Thanks:


Then I used the circle I cut out of that paper, cut it in half and made
Congratulations!:

 A simple
Thank You:


Again I used the cut out for another card, this time,
Happy Birthday: 

I'm planning on making more cards, as well as making lots of other gifts this year, so stay posted- hopefully I'll have lots to share!

Thursday, January 20, 2011

A Big Thank You- with a quick card!

I'm so excited- I made my first sale in my etsy shop!

It was fun to get the order, but before I shipped it off, I made a small gift from the extra fabric I used to make the item (I made a hair clip), and I also whipped up a quick Thank You card.
This really was a two minute project, so I know it's not much, but I think it's still pretty.
And I love it, since it represents my first success at something that I really want to do.

Tuesday, April 20, 2010

Cardswap

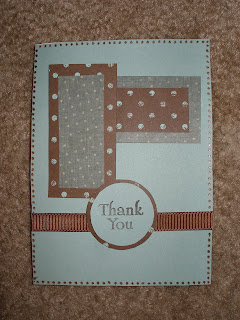
I found a sketch online for a card. I liked the sketch a lot, so I made twenty cards based on the sketch for my card swap- well I forgot to post my card for the sketch challenge, but here it is now that card swap is this week.
Mostly I'm proud of myself for using two patterned papers in one card. I have a small dot pattern in the background, and then I made two versions of the card with two different patterned papers-
I struggle to use patterns, I tend to prefer solid colors- so this was tough for me to use two patterns in one card- and bonus I did it twice- TWO different versions!

Thursday, February 4, 2010

Masculine 'Thank You's

After being laid off a couple of weeks ago, my husband went on the job hunt (obviously).
Well he had an interview today, and he wanted a thank you card to send to them. NO problem! I have tons of thank you cards already made. But, since he interviewed with a couple of guys, I decided not to give him one of my cards covered in flowers or butterflies; instead, I made a couple of masculine Thank you cards, using a few sketches I found online.
First, I used this weeks Mojo Monday Sketch
Then, I made a card following the sketch from CPS
Here's what my card looks like when it's closed
The right hand triangle opens to reveal a 'thank you' as you go to open the card
And when it's completely open it looks like this:

Monday, June 29, 2009

Late CPS

This card is based on a Sketch from CPS, but I missed the deadline, but I am entering it for the blog Adriennes Sentiments
Anyway, here is the sketch:

Here's the stamp that I used- It has a flower in the middle and say many thanks around it, I stamped it once on the green paper, and twice on pink, then I cut the center flowers out of the pink paper and folded them slightly so the flower would have three layers to it.


And now here is the finished project:

Tuesday, June 2, 2009

MIdnight Madness 3

Two days in a row!!! My son has gotten to an age where he can play on his own for long stretches of time, which means I have more time for crafting during the day... at least for the next 10 weeks until baby number 2 gets here.

So here we are; the card I made today for the Midnight Madness sketch challenge.

I cut a 4x6" card out of a burgundy card stock, and cut 4.5"x3.5" rectangles out of dark green and very pale green card stocks. I adhered the dark green piece to the light green piece just slightly offset, down and to the right.

Then I taped that down to the front of the card.

I used the same burgundy card stock and cut a 2.5" inch square and cut another 2.5"square from a mellow green color. I stamped 'Thank You' on the green square, stuck the two squares together at a slight angle, and taped that to the card.

With all of the paper pieces in place, I punched holes along the left hand side, where I placed my flowers, and fastened them with brads.

I then used a "paper ribbon" to go across the bottom.

Sunday, May 10, 2009

Thank You Card

Surprise! It's another card.
This one was one of my easier cards to make.
I made a 4x6 White card.
I cut a rectangle out of violet paper at 3.5"x5.5" and stuck it to the front of the card.
I cut a smaller rectangle out of white paper, it was 3.25 inches wide and about 4 inches tall.
Then I pulled out my handy Kraft Edgers scissors and cut the top and bottom edge of the white rectangle. I used a 1/4 inch hole punch to punch holes above (and below) every 3rd point in the scallop pattern.
I used a purple ink to "stress" the edges of the paper and used the same ink to stamp on the words "Thank You" and a pretty swirly thing. All that was left to do then was tape the stamped white paper down on top of the violet paper.

Friday, May 1, 2009

Watercolor Card

I saw an idea for water coloring cards online, and wanted to try it. I liked the uneven coloring of the water colors- it made me think "vintage". You may not see it, but I do...this card reminds me of something I would have seen in my grandmothers (or great-grandmothers) kitchen, which is just what I was going for.

I started with a small card this time, 6x4, folded in half to make the front of the card a mere 3"x4".
I stamped this sunflower and thank you onto the front with black ink.
Then I got out my watercolors, I'm not a painter, so I don't have any good quality painting stuff around, I just have the cheap little water color palates you can get in the kids aisle at Target.
I started by just painting a solid yellow stripe across the top of the flowers, and I let it dry.
I also painted a thin line across the "seeds" in brown.
Then, I cleaned my brush, and dipped it in water. I used the water to "drag" the watercolor paint out. Doing this causes the inside where the paint was originally to stay dark and the places where I pulled the color to are lighter. I intentionally left some spots white.
After that dried I cut some thin strips of a patterned green paper and taped them across the top and bottom of the card.

Thursday, October 23, 2008

and MORE Cards

I made new cards for the next month's cardswap.

First the birthday card. Simple I cut 8-1/2 x 11 red cardstock in half lengthwise then folded it in half and cut the edges off of one half... like so:


I used Kraft Edgers Scissors to cut a length of patterned paper from making memories, I cut it just wider than the skinny portion of the red cardstock.


Attach the two pieces and you get this:


Next I stamped "Happy Birthday" on a smaller piece of the same red cardstock and voila:


The other cards I made were Thank You


I layered two flowers I bought in the scrapbooking aisle to some cardstock using some cute little brads, then I painstakingly cut out circles from a golden colored cardstock, and then cut out slightly smaller circles from a dark brown cardstock, stuck all those circles onto the card, and then used a silver gel pen to write in the "THANKS"