Saturday, August 15, 2009

My Girls Room- The Bumper

I really disliked any of the patterned fabric I found in ink and brown, so when it was time to make the bumper for my little girls room, I decided to make my own little pattern.
Based on the height and length of the crib bumper I decided to make a pattern that measured about 7"x7".
Once I drew out the picture how I wanted it I traced over it with a marker.


Then I used a craft knife to cut out the pattern.


and I traced it onto my fabric.


I then used embroidery floss to fill in the pattern, pink for the flowers, and green for the stems.
I was a little bit overwhelmed by the idea of doing embroidery, but it turns out that it's not very hard at all, a little time consuming, but even that wasn't as bad as I had thought it would be.

I filled in the flowers with solid pink, but when I made the stems with green I decided to just use dashes, so they were less prominent.
I added batting to the back of this fabric, sewed on the back, and then finished the top edge with pink bias tape. I used the same bias tape to make the ties for the bumper.


Here's the finished product along with the rest of the bedding I made:

Friday, August 14, 2009

My Girls Room- The Windows

When I went to make window shades for my little girls room, I decided to, again, loosely follow the pattern I bought.

It was pretty easy.


They are a little bit too skinny for the window I think, but I still like it.


Here they are on both windows.

The hardest part may have actually been tying the pink bows nicely and evenly.

Thursday, August 13, 2009

My Girls Room- The Quilt

While working on my baby girls room- I decided to make a quilt to match the rest of the bedding.
I've never really quilted before, but I thought I could figure it out... Here's how I did it.
I cut out 2.5" squares from my pink and my brown fabric. (I used a 1/4" seam allowance so the squares ended up at 2".)
I started by sewing them in sets of two. So I had a bunch of rectangles that consisted of one pink square and one brown square. Then I ironed the seams open.
Next I took two rectangles and built a square, again pressing the seams open when I finished.
When I had a big pile of squares that were 4"x4" (consisting each of two brown squares and two pink squares) I sewed a row of five of these squares together so I had a long rectangle 4"x20".
I made seven of those rows, and sewed them together, and added one more single strips of squares, so the checkerboard part of the quilt measures 10 squares by 15 squares (20"x30")


I sewed a two inch border around the outside and attached batting to the back. I finished it by simply sewing a brown panel to the back.


Here it is, in my girls room:

Wednesday, August 12, 2009

My Girls Room- The Crib Skirt

So the next part of my little girls room that I worked on was the crib skirt/dust ruffle.
I wanted to do pink and brown throughout the room, but while I was looking for fabric I didn't find any patterned pink and brown fabric that I liked. All I could find were small flower prints or patterns that too many other colors mixed in. I wanted a big bold pattern so I decided to make it myself. I used plain pink and brown fabric and cut it into strips.
I cut 42 strips in each color at 1 inch wide. Then I cut 38 strips in each color measuring 2.5" wide.
I alternated the colors and sizes of the strips and sewed them together vertically.

After leaving a 1/4" inch seam allowance the final stripes were 1/2" and 2" wide.
The pattern I had called for the two long sides of the crib skirt to be 52" and the short side to measure at 26". I wanted to have some 'ruffle' in my dust ruffle though so I made them longer. My long sides were 62 inches long and the short sides were 31 inches each.
I used pink double-fold bias tape to finish off the lower edge of the ruffle.
So after I cut out a base to go under the mattress in the crib (out of a plain white fabric) it was time to pin the ruffles to the base. Since I had purposely made them 'too wide', I had to work to evenly distribute that extra length throughout the piece.
I sewed the sides to the base with right sides together. Then I turned the ruffle over and top stitched right next to the original stitching line to help it lie flat.
Here's the finished ruffle.

And hanging in the crib: under the sheet.

Tuesday, August 11, 2009

My Girls Room- The Sheet

So I am about a week away from having a little baby girl, and since my husband and I were not able to find bedding that we really liked I decided to make it myself. I am not a great sewer... but the best way to fix that is to practice right?

I bought a pattern set for some nursery accessories, and loosely based my stuff off of those patterns. Except the sheet, I cut the sheet exactly as the pattern said.

I will tell you that originally I was not planning on making the sheet, I was going to buy a plain sheet, and making accessories to match, I thought that the sheet would be really difficult for some reason, but I was WRONG. It was probably the easiest part of the whole room.


So in the end I made two.

Monday, August 10, 2009

My Girls Room- The Mobile

So the last thing that I made for my little girls room was a mobile. The structure of the mobile was just the plastic pieces from my sons mobile, with the fabric removed.
For the hanging pieces of the mobile, I drew out a star and a heart on card stock, and then traced four of each shape onto my brown fabric and cut them out.
I used some of my leftover bias tape and sewed stripes across one side of two of the hearts and two of the stars. Then I sewed those, right sides together with the leftover shapes, leaving a whole a the bottom of the shape to turn it right side out and to stuff. Then I just hand stitched the last bit closed.


I took embroidery floss that I had leftover and hand stitched it through four points in the backs of the shapes. and tied them off.


For the top, I measured out the size of the triangle between the plastic points, and cut out four of them. I used bias tape and finished the two short edges of each triangle with the bias tape.
I then stitched all four triangles together to form the square, leaving a hole in the middle for the hook of the mobile to go through. Then I used more of the bias tape to finish the outside edge of the piece, and hung the stuffed hearts and stars from the top piece.

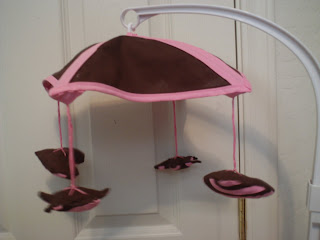
This mobile is the part of the room that I am least happy with. It was my first try with some of this stuff, and I struggled the outcome was okay but I'm not really happy with it.