Thursday, December 10, 2009

Cakes

So here are two cakes that I made recently
They were both actually for church. The first was for an activity I had with some of the young women; the activity had to do with babies so I made a mock baby shower cake.


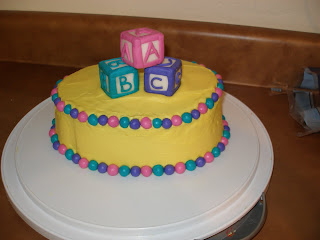
I made a lemon cake and used a lemon frosting, which I added food dye to in order to make it a brighter yellow. I formed the blocks out of fondant, and colored three colors of fondant. I rolled out the colors to about 1/16th inch and then folded them over the corner of a box while they dried for a little bit to give them a nice bend. I cut the pieces to size and stuck them on. Then I rolled out some fondant and shaped it into letters, the leftover colors were used to make balls to go for the border.

The next cake was also for the young women at church. The young women work with a program called personal progress, and they have 8 values that each have a color to represent them. So I made a three tier, (two layer each) cake covered with white fondant, and I colored fondant to make swags, and flowers in each value color. I also made balls for the border from each color to match.

Tuesday, December 1, 2009

Christmas Gift Tags

A few months ago, I found an idea for recycling grocery ads. When i saw it I thought it would be cute for a card, but ended up using the idea to make Christmas gift tags for my card swap.
So I cut up Walmart Grocery ads, since they were glossy, and had lots of red and green in them.

I made myself a stencil, and cut out a folded tag from white card stock and similar shaped tags from red and green card stock.

I drew Christmas trees onto the tags, and cut out the tree using a craft knife.

I glued the strips of the ads to the back of the trees, then secured the tress to the white tags.
Lastly, I punched a hole in the top of the tag and threaded a ribbon through each one.

Monday, November 2, 2009

Little Lion

I made my sons Halloween Costume this year:
Isn't he cute? I bought a Simplicity pattern for this, I'm still too new at sewing to go without a pattern for stuff like this. I enjoyed making it, and it was good practice so that someday I could be great at sewing (maybe). Plus, I love that he looked different from all of the other kids in their store-bought costumes.

Tuesday, October 6, 2009

Copycat Halloween

So I usually design all of my own cards... to me that's half the fun. This time I copied. A woman at my card swap made a Halloween card and I used her idea for some Halloween party invites I made. I of course changed many things from her idea, but it's still not really an original. I thought I would share it anyway, so that every one can see her wonderful idea.
I used a 4x6 brown card. I cut out 2" squares from orange paper, and 1.5" squares from black paper. I taped the little black square onto the little orange square and then taped those near the top of the card.

I used white ink to stamp a pumpkin onto the black square. Does everybody else have a problem having their white ink show up?? I had a friend use white acrylic paint to stamp, and it turned out much clearer than this, I'm going to try that next time.

Anyway, the white stamp ink shows really well on non-porous surfaces so I stamped Happy Halloween on a 4x6 inch transparency. (I bought transparencies at Office Max and then cut them down.)

Then I punched little holes in the transparencies and the cards, and attached the transparency with brads. All Done!!

Happy Halloween Everyone!

Monday, September 28, 2009

Baby Boy Shower

I was asked to make cupcakes and cake pops for a girl from church for her baby shower.

Here's how I set it up. I bought a Wilton 4-Tier Dessert Stand, and a package of two circles of flower foam. I cut a small circle out of the center of one of the pieces of foam the size of the "bump" in the center of the top tier. I placed that piece of foam on the top tier and placed four toothpicks into the foam


Then I just put the second circle on top.

I used my KraftEdgers Scissors and cut two 4" strips from a 12x12 piece of scrapbook paper.
I used sewing pins to hold the first piece of paper in place around the foam, then overlapped the edges with the second strip of paper and used glue to adhere the top paper to the bottom.

Then I randomly placed my cake pops into the foam.

I also made cupcakes, they were just classic yellow cupcakes, and I used tip 1M to pipe extra large stars into the center of the cupcake, after this picture was taken I also cut out very small stars from white fondant and placed the on the top of the icing.

Here's how it all turned out:

Wednesday, September 2, 2009

Daily Blog Candy Giveaway!!!

Over at Crafts International there are daily, yes DAILY giveaways going on... stop on over and check it out!

Tuesday, September 1, 2009

Yo-yo Hair clips

I've shown a couple different kinds of hair clips, but here's another variation. These are made using yo-yo's. I'm sure everyone knows how to make a yo-yo, but if you don't, you can buy them premade at Joann's (which since they are so easy would be a waste of money, I think), or there is a really easy tutorial here at Heather Bailey's Blog.

They're so fast and easy, and you can use these beauties for a million things!
Anyway, For the hair clips, I used the same clips, and covered them the same way I did before,
But instead of gluing silk flowers onto the hair clip, I just used my glue gun to glue the yo yo's to the clip. Of course, if you're sewing the button into the middle, you want to do that before you glue it down.


I used a black and white quarter flat for the fabric, And I made four yo yo's, in two different sizes. I layered the smaller yo yo on top of the lager one. I sewed the button through both of the yo yos, so they were all held together, and then glued them down. That's all I had to do, I think the yo yo clips might be my favorites!

Saturday, August 15, 2009

My Girls Room- The Bumper

I really disliked any of the patterned fabric I found in ink and brown, so when it was time to make the bumper for my little girls room, I decided to make my own little pattern.
Based on the height and length of the crib bumper I decided to make a pattern that measured about 7"x7".
Once I drew out the picture how I wanted it I traced over it with a marker.


Then I used a craft knife to cut out the pattern.


and I traced it onto my fabric.


I then used embroidery floss to fill in the pattern, pink for the flowers, and green for the stems.
I was a little bit overwhelmed by the idea of doing embroidery, but it turns out that it's not very hard at all, a little time consuming, but even that wasn't as bad as I had thought it would be.

I filled in the flowers with solid pink, but when I made the stems with green I decided to just use dashes, so they were less prominent.
I added batting to the back of this fabric, sewed on the back, and then finished the top edge with pink bias tape. I used the same bias tape to make the ties for the bumper.


Here's the finished product along with the rest of the bedding I made:

Friday, August 14, 2009

My Girls Room- The Windows

When I went to make window shades for my little girls room, I decided to, again, loosely follow the pattern I bought.

It was pretty easy.


They are a little bit too skinny for the window I think, but I still like it.


Here they are on both windows.

The hardest part may have actually been tying the pink bows nicely and evenly.

Thursday, August 13, 2009

My Girls Room- The Quilt

While working on my baby girls room- I decided to make a quilt to match the rest of the bedding.
I've never really quilted before, but I thought I could figure it out... Here's how I did it.
I cut out 2.5" squares from my pink and my brown fabric. (I used a 1/4" seam allowance so the squares ended up at 2".)
I started by sewing them in sets of two. So I had a bunch of rectangles that consisted of one pink square and one brown square. Then I ironed the seams open.
Next I took two rectangles and built a square, again pressing the seams open when I finished.
When I had a big pile of squares that were 4"x4" (consisting each of two brown squares and two pink squares) I sewed a row of five of these squares together so I had a long rectangle 4"x20".
I made seven of those rows, and sewed them together, and added one more single strips of squares, so the checkerboard part of the quilt measures 10 squares by 15 squares (20"x30")


I sewed a two inch border around the outside and attached batting to the back. I finished it by simply sewing a brown panel to the back.


Here it is, in my girls room:

Wednesday, August 12, 2009

My Girls Room- The Crib Skirt

So the next part of my little girls room that I worked on was the crib skirt/dust ruffle.
I wanted to do pink and brown throughout the room, but while I was looking for fabric I didn't find any patterned pink and brown fabric that I liked. All I could find were small flower prints or patterns that too many other colors mixed in. I wanted a big bold pattern so I decided to make it myself. I used plain pink and brown fabric and cut it into strips.
I cut 42 strips in each color at 1 inch wide. Then I cut 38 strips in each color measuring 2.5" wide.
I alternated the colors and sizes of the strips and sewed them together vertically.

After leaving a 1/4" inch seam allowance the final stripes were 1/2" and 2" wide.
The pattern I had called for the two long sides of the crib skirt to be 52" and the short side to measure at 26". I wanted to have some 'ruffle' in my dust ruffle though so I made them longer. My long sides were 62 inches long and the short sides were 31 inches each.
I used pink double-fold bias tape to finish off the lower edge of the ruffle.
So after I cut out a base to go under the mattress in the crib (out of a plain white fabric) it was time to pin the ruffles to the base. Since I had purposely made them 'too wide', I had to work to evenly distribute that extra length throughout the piece.
I sewed the sides to the base with right sides together. Then I turned the ruffle over and top stitched right next to the original stitching line to help it lie flat.
Here's the finished ruffle.

And hanging in the crib: under the sheet.

Tuesday, August 11, 2009

My Girls Room- The Sheet

So I am about a week away from having a little baby girl, and since my husband and I were not able to find bedding that we really liked I decided to make it myself. I am not a great sewer... but the best way to fix that is to practice right?

I bought a pattern set for some nursery accessories, and loosely based my stuff off of those patterns. Except the sheet, I cut the sheet exactly as the pattern said.

I will tell you that originally I was not planning on making the sheet, I was going to buy a plain sheet, and making accessories to match, I thought that the sheet would be really difficult for some reason, but I was WRONG. It was probably the easiest part of the whole room.


So in the end I made two.

Monday, August 10, 2009

My Girls Room- The Mobile

So the last thing that I made for my little girls room was a mobile. The structure of the mobile was just the plastic pieces from my sons mobile, with the fabric removed.
For the hanging pieces of the mobile, I drew out a star and a heart on card stock, and then traced four of each shape onto my brown fabric and cut them out.
I used some of my leftover bias tape and sewed stripes across one side of two of the hearts and two of the stars. Then I sewed those, right sides together with the leftover shapes, leaving a whole a the bottom of the shape to turn it right side out and to stuff. Then I just hand stitched the last bit closed.


I took embroidery floss that I had leftover and hand stitched it through four points in the backs of the shapes. and tied them off.


For the top, I measured out the size of the triangle between the plastic points, and cut out four of them. I used bias tape and finished the two short edges of each triangle with the bias tape.
I then stitched all four triangles together to form the square, leaving a hole in the middle for the hook of the mobile to go through. Then I used more of the bias tape to finish the outside edge of the piece, and hung the stuffed hearts and stars from the top piece.

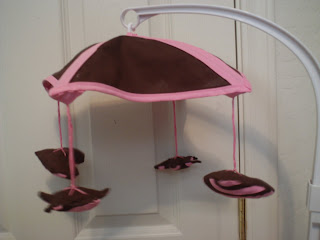
This mobile is the part of the room that I am least happy with. It was my first try with some of this stuff, and I struggled the outcome was okay but I'm not really happy with it.

Wednesday, July 15, 2009

Fabric Flower Hair Clips

I found a tutorial here for making a five petal flower from fabric. You could use these in lots of different ways, So far I have just used mine for some hair clips.


I used the same clips, and covered them the same way as I did when I made Silk Flower Hair Clips.


Then I sewed the flowers according to the tutorial. Just so you know, the larger your stitches are, the smaller the hole will be in the center of the flower. Also your fabric will change the size of the hole in the center, thinner, lighter fabrics will create a smaller more closed in hole. If you choose to use smaller stitches closer together, then you will be left with a larger space to fill; so your will need a larger button to cover the center. Once I finished the flower, I just got out the glue gun and glued the flower onto the hair clip.

The tutorial says to use 6 squares, that are 3"x3"...You actually only need five squares. these last two flowers were made using smaller squares of fabric. Also, if you are using a button that has only two holes it may wiggle around a little bit more, if it does that and it shows some of the raw edges to your fabric, just use a little hot glue to keep the button in its place.

Thursday, July 9, 2009

Thinking of You

So here's another card that I designed for card swap.
First ---the cutting.
I cut white card stock into 5.5"x7.5" pieces to make a 3.75x"5.5" card.
I cut some of this pretty pink patterned paper into 3.5x"5.25" rectangles.
Next I cut strips from a black pinstripe paper at 1"x5.25"
I then cut strips from both a burgundy paper and vellum in strips that measure1/2"x5.25"
Then two rectangles, one from the same burgundy paper and one from vellum- these were 2"x3".
I taped the patterned paper down onto the card. taped the pinstriped paper across the card, in the bottom half.
In the center of the pinstriped strip I taped down the burgundy strip of paper, and glued the vellum strip on top of that.
I Stamped a flower and 'thinking of you' onto the vellum rectangle, and adhered that to the burgundy rectangle, then taped that to the card.
I finished it by taking two self adhesive metal dots and putting them on either end of the stamped vellum rectangle. You could probably stress the edges of the vellum to give it a little more depth. But there you have it.
This card was actually made for this month when it was my turn to host- so of course I made treats too.
I made a three layer single tier red velvet cake, and I wanted to have it match with the card that we all made together.
I took the stamps that I used for the card and stamped them on a sheet of white paper, scanned it into the computer, enlarged the images, and printed it up. I transferred the pattern onto the cake using parchment paper and piping gel.
On the sides, I didn't want to try to copy the pattern off of the pink paper exactly, but I did something swirly and pink to give the same idea.
Then I made Bakerella cake balls with the scraps from the cake.

Tuesday, July 7, 2009

Mojo 94

I have made another Card for Mojo Monday.
Here is this weeks Sketch:


There is a lot of stuff on this card- so at first I was going to do something sort of monochromatic, like mostly black and white, with just one accent color in a few places, but I was looking through my pile of scrap that I save and decided to put these papers together and so I ended up with something more colorful.


I used matching Gel Pens to trace over parts of the stamps and draw "stitches" around the edge of the card.