Saturday, December 3, 2011

Houndstooth for Christmas

I love hounds tooth clothing/accessories- who doesn't?
Well I have some Christmas colored houndstooth scrapbook paper, so I decided to make some cute stuff with it.

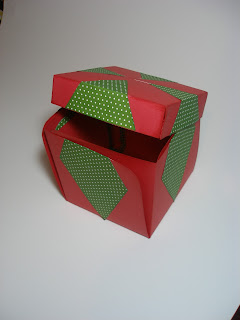
First I made a box that I had wanted to make for a long time. It was modeled after a box that my mom had sitting around. She had purchased a Swarovski Christmas ornament and she let me steal the box it came in. 

So I tried to remake the box and did it in red and white hounds tooth paper.

Here's the result


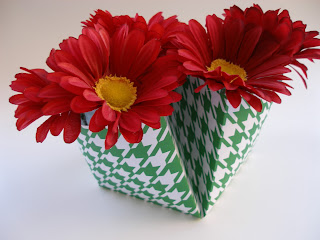
Then I saw an idea somewhere online for these little 'baskets' made from 12x12 sheets, so I pulled out some more hounds tooth; this time in green as well as red

 Green and White Houndstooth Basket

 Full of flowers:


 Red and White Basket with ribbon:


With some pretty yellow flowers: 


The box is for sale here in mt etsy shop.
The baskets, I'm not sure about- I might list them on etsy, Or I might just keep them for myself- I haven't decided!


And you wouldn't believe what I found- Houndstooth stamps! How fun is that?!?


Friday, November 25, 2011

Greeting Cards

So I like to do crafts and I'm on a budget.
With Christmas around the corner you all know that means it's time to start hand making some Christmas gifts.
I've only just begun, but I plan on making  a big pile of greeting cards for my mom and my mother-in-law. They have previously received these for Christmas and loved them.

I want to do a few intricate cards and a bunch of cards that are a little simpler. I started with simple. I've made two or three copies of 4 different cards so far.

 Many Thanks:


Then I used the circle I cut out of that paper, cut it in half and made
Congratulations!:

 A simple
Thank You:


Again I used the cut out for another card, this time,
Happy Birthday: 

I'm planning on making more cards, as well as making lots of other gifts this year, so stay posted- hopefully I'll have lots to share!

Sunday, November 6, 2011

Christmas Boxes

One day i was sitting around, about to make another exploding box, but I decided this paper wasn't right for it.
So then I thought- What if I make a simple box that has 4 flaps on the top that fold over each other the way a standard moving box does?
I had never tried one before or seen how to make one but it was really very simple.
I made 8!
4 red and 4 green.
Each color has two each of a 4"x4"x4" and 3"x3"x3" box

Here are the finished products:


For sale in my etsy shop: JLynneCreationshttp://www.etsy.com/shop/JLynneCreations

Tuesday, November 1, 2011

Small Origami Boxes

I made 12 small boxes in Christmas colors.

I actually used an origami technique that I learned in 6th grade art class. I learned how to make a box and lid like this and have been making these boxes ever since.


I have them for sale HERE in etsy store in sets of six.

These boxes are surprisingly easy to make. I'm thinking about creating a pdf pattern and instructions for it- anyone could make these fun little boxes.

Otherwise you could contact me for custom box if you are interested in some of these little boxes with a different paper.

I'll keep you posted about the patterns!

Thursday, October 27, 2011

Seat Covers

With a couple little kids around I have to worry about messes- especially in the kitchen.
For long time my son was sitting on top of a towel and my daughter's booster seat was also resting on a kitchen towel.
It worked, but then we were short two towels for use in the kitchen and they just kept sliding off the chairs.

So when I got this sturdy Teflon-treated (Teflon treated=stain resistant) plaid fabric I knew at least one thing I wanted to use it for.
Seat covers!


They were simple.

1. I measured the seat and cut out 2 pieces of fabric slightly larger than the seat.  
2. Sewed around 3-1/2 edges of the fabric with right sides together.
3. I clipped corners and turned it around.

Then the straps:
1. And measured the distance from one side to the other under the chair and around the back posts. I cut out three inch wide strips of fabric just slightly longer than those measurements
2. I folded the fabric in half lengthwise and sewed down the edge with the right sides together. then turned them right-side-out
3. I sewed velcro to the ends. (On the long straps that went under the chairs one strap got the hook side and the other got the soft/fuzzy side.)

4. I figured out where I wanted my straps to attach. and also sewed down the other side of the velcro for the straps that went around the back posts of the chairs.
5. Using a seam ripper, I removed the seam for about two inches in each location that I wanted a strap- then tucked the end of the strap into that newly created whole and pinned in pace.

Almost Done:
Lastly I top-stitched all the way around, this took care of...
-closing up the hole I left open to turn it after it was inside out,
-closing the holes used to place the straps in and
-attaching the straps.


I really like this fabric- I also made a couple of crayon rolls out of for a few little birthday gifts and a fun bag, for sale here in my etsy shop.

Wednesday, October 26, 2011

Dress Lengthening

My mother found a dress that she liked, except that it was a bit too short for her taste.
So she asked me to lengthen it a bit.
We decided to cut the bottom 3" off the dress.
I sewed a 7" piece of black fabric (of a similar fabric and texture) onto the dress, then re-attached the three inches I had previously cut off of the bottom.
Hopefully, this way- it doesn't look like some afterthought or alteration. We think it looks more as if it were part of the original dress, than it would if we just stuck the black piece across the bottom

Wednesday, October 12, 2011

Etsy Finds

I thought I might occasionally share  few shops I find on etsy that stand out to me. Here are 3 that I love:


Art and word work:

Cute plush creatures:


and here's a shop for any Harry Potter fan (or anyone who has a Harry Potter fan on their holiday shopping list):

Stop by and enjoy the fabulous items they have to offer!

Tuesday, September 27, 2011

Glitter Box

I made another Exploding Box. this one is a little bit smaller than the others have been, but this one also has GLITTER on it!
(on the outside of the box and top of the lid)


Fun sparkles on the outside;
And as always, fun layers on the inside!


Want it? Buy it here.


I like the glitter a lot- I'm making another one, and I think it's going to end up with some glitter also!

Saturday, September 24, 2011

Christmas Boxes

I made some more Christmas themed exploding boxes.

This first one already sold in my etsy shop:


And I decided to try something different. Instead of the traditional square box I made one shaped like a diamond.

With candy cane stripes!


This one is still for sale in my etsy shop: here!