Thursday, October 27, 2011

Seat Covers

With a couple little kids around I have to worry about messes- especially in the kitchen.
For long time my son was sitting on top of a towel and my daughter's booster seat was also resting on a kitchen towel.
It worked, but then we were short two towels for use in the kitchen and they just kept sliding off the chairs.

So when I got this sturdy Teflon-treated (Teflon treated=stain resistant) plaid fabric I knew at least one thing I wanted to use it for.
Seat covers!


They were simple.

1. I measured the seat and cut out 2 pieces of fabric slightly larger than the seat.  
2. Sewed around 3-1/2 edges of the fabric with right sides together.
3. I clipped corners and turned it around.

Then the straps:
1. And measured the distance from one side to the other under the chair and around the back posts. I cut out three inch wide strips of fabric just slightly longer than those measurements
2. I folded the fabric in half lengthwise and sewed down the edge with the right sides together. then turned them right-side-out
3. I sewed velcro to the ends. (On the long straps that went under the chairs one strap got the hook side and the other got the soft/fuzzy side.)

4. I figured out where I wanted my straps to attach. and also sewed down the other side of the velcro for the straps that went around the back posts of the chairs.
5. Using a seam ripper, I removed the seam for about two inches in each location that I wanted a strap- then tucked the end of the strap into that newly created whole and pinned in pace.

Almost Done:
Lastly I top-stitched all the way around, this took care of...
-closing up the hole I left open to turn it after it was inside out,
-closing the holes used to place the straps in and
-attaching the straps.


I really like this fabric- I also made a couple of crayon rolls out of for a few little birthday gifts and a fun bag, for sale here in my etsy shop.

Wednesday, October 26, 2011

Dress Lengthening

My mother found a dress that she liked, except that it was a bit too short for her taste.
So she asked me to lengthen it a bit.
We decided to cut the bottom 3" off the dress.
I sewed a 7" piece of black fabric (of a similar fabric and texture) onto the dress, then re-attached the three inches I had previously cut off of the bottom.
Hopefully, this way- it doesn't look like some afterthought or alteration. We think it looks more as if it were part of the original dress, than it would if we just stuck the black piece across the bottom

Wednesday, October 12, 2011

Etsy Finds

I thought I might occasionally share  few shops I find on etsy that stand out to me. Here are 3 that I love:


Art and word work:

Cute plush creatures:


and here's a shop for any Harry Potter fan (or anyone who has a Harry Potter fan on their holiday shopping list):

Stop by and enjoy the fabulous items they have to offer!

Tuesday, September 27, 2011

Glitter Box

I made another Exploding Box. this one is a little bit smaller than the others have been, but this one also has GLITTER on it!
(on the outside of the box and top of the lid)


Fun sparkles on the outside;
And as always, fun layers on the inside!


Want it? Buy it here.


I like the glitter a lot- I'm making another one, and I think it's going to end up with some glitter also!

Saturday, September 24, 2011

Christmas Boxes

I made some more Christmas themed exploding boxes.

This first one already sold in my etsy shop:


And I decided to try something different. Instead of the traditional square box I made one shaped like a diamond.

With candy cane stripes!


This one is still for sale in my etsy shop: here!

Wednesday, September 7, 2011

Another Exploding Box

I really like these exploding boxes, they're unique and fun.
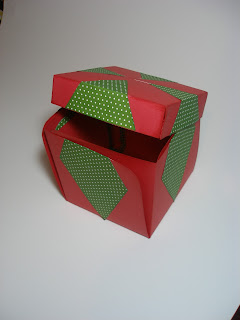
I made two more with Christmas in mind, they're both the same-- Candy Cane Stripes with green accents.

Here's the finished product from the outside:
A nice, simple box...


 But open it up...


And the box falls open to reveal these fun layers inside: 


I think these would be great as a special and unique way to wrap a small Christmas gift or Holiday treats.
But, I've also seen these exploding boxes used a mini photo albums. Place a different photo or sentiment on each layer and it would make a creative way to preserve your memories.

And just for fun... here's a progress shot: 
This is what the lids looked like after I attached the green trim around the edges. I though it looked funny, and was worth taking a picture.

Anyway, you can buy one or both of these boxes here, in my etsy shop. Or if you want an exploding box with a different twist leave a comment or convo me on etsy- I would love to create a custom box for you!

Monday, August 29, 2011

Snowman Ornament

I have a confession... I'm a craft hoarder. Which means:
* I buy craft supplies at clearance/discount price- then store it until I have something to use it for
And it also means:
*I hate throwing scraps away if they seem 'usable'
So I had a few scraps after making my latest exploding box.
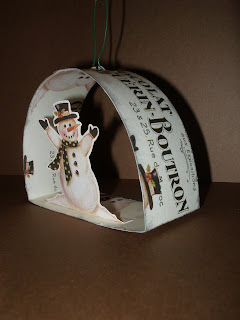
I decided to use them to make a Christmas tree ornament.


I'm selling it here in my etsy shop.

Monday, August 22, 2011

Snowman Exploding Box

I've made another exploding box and it's for sale here in my etsy shop


This one is a winter theme and would be perfect for holding a Christmas/holiday gift
I love exploding boxes because they seem so nice and simple on the outside, but they're hiding some extra layers of fun on the inside.


Inside the box

All opened up


Tuesday, August 9, 2011

Children's Quilt

I got the opportunity to make a custom order quilt.


I was asked to make it with large squares of various characters from children's movies and television.
She wanted the quilt to be random, and have no particular direction, so not all of the squares should face the same way.
So here's what I did: 
The back of the quilt is just solid red, in the same fabric as the red on the front.

And After the quilt I had one extra pre-cut square of fabric-
 So I made a bonus pillow, to throw in with the quilt: 

I love making pillows and bedding, You can request a custom order in my etsy shop :JLynneCreations

Monday, August 1, 2011

Car Seat Tent

Just before my last precious baby was born I made a reversible car seat cover.
I love it.
When I'm at the store it keeps people (complete strangers) from touching my baby
It keeps the bright Arizona sunlight out
And It's cute! Especially the brown ruffle around the edge.

Pink and brown on one side:

Solid brown on the other:

Wednesday, June 1, 2011

Double Sided Grocery Totes

With the same fabrics I used for my set of 4 grocery totes, I made two more... these are reversible, so that on the outside of the bag you have one design and another on the inside.

Apples and Watermelon

But you can flip it either way you like.


Apples.....               or...           Watermelon 

 Whatever you like better


Or Jalapenos and Cherries

Or Cherries and Jalapenos

For sale here: 2 Reversible Totes