A toolbox cake, covered with fondant.
Sunday, February 28, 2010
Birthday Cake
A toolbox cake, covered with fondant.
Monday, February 15, 2010
Hair Clip Holders
So, I went to Joann's and I bought two matching ribbons, both were brown with pink polka dots.
I got one 3/8" ribbon and one 1.5" ribbon.
I cut the 1.5" ribbon into 18" strips, I folded over the ends about 1/4 inch and just ran a straight stitch across to hold them in place.
I made small bows out of the 3/8" ribbon and stitched them down on to the top of the wider ribbon.
Thursday, February 4, 2010
Masculine 'Thank You's


Monday, February 1, 2010
Baby Boy Shower
The shower colors were green and brown, and her theme was mama bear/baby bear
The cake:
A mama bear and baby bear (sculpted out of fondant) walking together.
I used chocolate buttercream for the paw prints, I used round tips of varying sizes, and then I dipped my finger in cornstarch and then gently tapped the paw prints to flatten them down.
Here are some cake balls:
After making the cake I had some extra batter, so I made 12 cupcakes.
Friday, January 1, 2010
Christmas Wreath
I just took the ribbon and tucked it into the wreathin random spots. Whem I like dhow it looked I took a needle and thread and just tied the ribbon down, to keep it in place.
Then, I tied a big bow with the ribbon and stuck that on with the needle and thread also.
Lastly, I bought some bunches of berries from Michaels. I tore apart the bunches and then hot glued some of the 'berries' onto the wreath.
Merry Christmas!!
Thursday, December 10, 2009
Cakes
They were both actually for church. The first was for an activity I had with some of the young women; the activity had to do with babies so I made a mock baby shower cake.
I made a lemon cake and used a lemon frosting, which I added food dye to in order to make it a brighter yellow. I formed the blocks out of fondant, and colored three colors of fondant. I rolled out the colors to about 1/16th inch and then folded them over the corner of a box while they dried for a little bit to give them a nice bend. I cut the pieces to size and stuck them on. Then I rolled out some fondant and shaped it into letters, the leftover colors were used to make balls to go for the border.
The next cake was also for the young women at church. The young women work with a program called personal progress, and they have 8 values that each have a color to represent them. So I made a three tier, (two layer each) cake covered with white fondant, and I colored fondant to make swags, and flowers in each value color. I also made balls for the border from each color to match.
Tuesday, December 1, 2009
Christmas Gift Tags
So I cut up Walmart Grocery ads, since they were glossy, and had lots of red and green in them.
I made myself a stencil, and cut out a folded tag from white card stock and similar shaped tags from red and green card stock.
I drew Christmas trees onto the tags, and cut out the tree using a craft knife.
I glued the strips of the ads to the back of the trees, then secured the tress to the white tags.
Lastly, I punched a hole in the top of the tag and threaded a ribbon through each one.
Monday, November 2, 2009
Little Lion
Tuesday, October 6, 2009
Copycat Halloween
I used a 4x6 brown card. I cut out 2" squares from orange paper, and 1.5" squares from black paper. I taped the little black square onto the little orange square and then taped those near the top of the card.
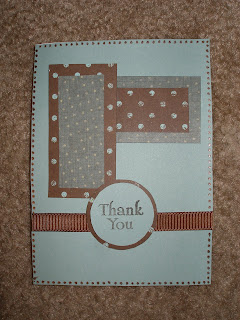
I used white ink to stamp a pumpkin onto the black square. Does everybody else have a problem having their white ink show up?? I had a friend use white acrylic paint to stamp, and it turned out much clearer than this, I'm going to try that next time.
Anyway, the white stamp ink shows really well on non-porous surfaces so I stamped Happy Halloween on a 4x6 inch transparency. (I bought transparencies at Office Max and then cut them down.)
Then I punched little holes in the transparencies and the cards, and attached the transparency with brads. All Done!!
Happy Halloween Everyone!
Monday, September 28, 2009
Baby Boy Shower
Here's how I set it up. I bought a Wilton 4-Tier Dessert Stand, and a package of two circles of flower foam. I cut a small circle out of the center of one of the pieces of foam the size of the "bump" in the center of the top tier. I placed that piece of foam on the top tier and placed four toothpicks into the foam
Then I just put the second circle on top.
I used my KraftEdgers Scissors and cut two 4" strips from a 12x12 piece of scrapbook paper.
I used sewing pins to hold the first piece of paper in place around the foam, then overlapped the edges with the second strip of paper and used glue to adhere the top paper to the bottom.
Then I randomly placed my cake pops into the foam.
I also made cupcakes, they were just classic yellow cupcakes, and I used tip 1M to pipe extra large stars into the center of the cupcake, after this picture was taken I also cut out very small stars from white fondant and placed the on the top of the icing.
Here's how it all turned out:
Wednesday, September 2, 2009
Daily Blog Candy Giveaway!!!
Tuesday, September 1, 2009
Yo-yo Hair clips
Anyway, For the hair clips, I used the same clips, and covered them the same way I did before,
But instead of gluing silk flowers onto the hair clip, I just used my glue gun to glue the yo yo's to the clip. Of course, if you're sewing the button into the middle, you want to do that before you glue it down.
I used a black and white quarter flat for the fabric, And I made four yo yo's, in two different sizes. I layered the smaller yo yo on top of the lager one. I sewed the button through both of the yo yos, so they were all held together, and then glued them down. That's all I had to do, I think the yo yo clips might be my favorites!
Saturday, August 15, 2009
My Girls Room- The Bumper
Based on the height and length of the crib bumper I decided to make a pattern that measured about 7"x7".
Once I drew out the picture how I wanted it I traced over it with a marker.
Then I used a craft knife to cut out the pattern.
and I traced it onto my fabric.
I then used embroidery floss to fill in the pattern, pink for the flowers, and green for the stems.
I was a little bit overwhelmed by the idea of doing embroidery, but it turns out that it's not very hard at all, a little time consuming, but even that wasn't as bad as I had thought it would be.
I added batting to the back of this fabric, sewed on the back, and then finished the top edge with pink bias tape. I used the same bias tape to make the ties for the bumper.
Here's the finished product along with the rest of the bedding I made:
Friday, August 14, 2009
My Girls Room- The Windows
It was pretty easy.
They are a little bit too skinny for the window I think, but I still like it.
Here they are on both windows.
Thursday, August 13, 2009
My Girls Room- The Quilt
I've never really quilted before, but I thought I could figure it out... Here's how I did it.
I cut out 2.5" squares from my pink and my brown fabric. (I used a 1/4" seam allowance so the squares ended up at 2".)
I started by sewing them in sets of two. So I had a bunch of rectangles that consisted of one pink square and one brown square. Then I ironed the seams open.
Next I took two rectangles and built a square, again pressing the seams open when I finished.
When I had a big pile of squares that were 4"x4" (consisting each of two brown squares and two pink squares) I sewed a row of five of these squares together so I had a long rectangle 4"x20".
I made seven of those rows, and sewed them together, and added one more single strips of squares, so the checkerboard part of the quilt measures 10 squares by 15 squares (20"x30")
I sewed a two inch border around the outside and attached batting to the back. I finished it by simply sewing a brown panel to the back.
Here it is, in my girls room: