Monday, August 10, 2009

My Girls Room- The Mobile

So the last thing that I made for my little girls room was a mobile. The structure of the mobile was just the plastic pieces from my sons mobile, with the fabric removed.
For the hanging pieces of the mobile, I drew out a star and a heart on card stock, and then traced four of each shape onto my brown fabric and cut them out.
I used some of my leftover bias tape and sewed stripes across one side of two of the hearts and two of the stars. Then I sewed those, right sides together with the leftover shapes, leaving a whole a the bottom of the shape to turn it right side out and to stuff. Then I just hand stitched the last bit closed.


I took embroidery floss that I had leftover and hand stitched it through four points in the backs of the shapes. and tied them off.


For the top, I measured out the size of the triangle between the plastic points, and cut out four of them. I used bias tape and finished the two short edges of each triangle with the bias tape.
I then stitched all four triangles together to form the square, leaving a hole in the middle for the hook of the mobile to go through. Then I used more of the bias tape to finish the outside edge of the piece, and hung the stuffed hearts and stars from the top piece.

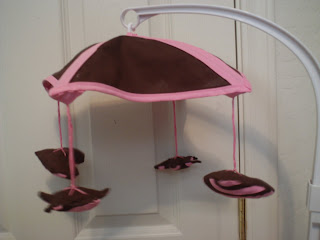
This mobile is the part of the room that I am least happy with. It was my first try with some of this stuff, and I struggled the outcome was okay but I'm not really happy with it.

Wednesday, July 15, 2009

Fabric Flower Hair Clips

I found a tutorial here for making a five petal flower from fabric. You could use these in lots of different ways, So far I have just used mine for some hair clips.


I used the same clips, and covered them the same way as I did when I made Silk Flower Hair Clips.


Then I sewed the flowers according to the tutorial. Just so you know, the larger your stitches are, the smaller the hole will be in the center of the flower. Also your fabric will change the size of the hole in the center, thinner, lighter fabrics will create a smaller more closed in hole. If you choose to use smaller stitches closer together, then you will be left with a larger space to fill; so your will need a larger button to cover the center. Once I finished the flower, I just got out the glue gun and glued the flower onto the hair clip.

The tutorial says to use 6 squares, that are 3"x3"...You actually only need five squares. these last two flowers were made using smaller squares of fabric. Also, if you are using a button that has only two holes it may wiggle around a little bit more, if it does that and it shows some of the raw edges to your fabric, just use a little hot glue to keep the button in its place.

Thursday, July 9, 2009

Thinking of You

So here's another card that I designed for card swap.
First ---the cutting.
I cut white card stock into 5.5"x7.5" pieces to make a 3.75x"5.5" card.
I cut some of this pretty pink patterned paper into 3.5x"5.25" rectangles.
Next I cut strips from a black pinstripe paper at 1"x5.25"
I then cut strips from both a burgundy paper and vellum in strips that measure1/2"x5.25"
Then two rectangles, one from the same burgundy paper and one from vellum- these were 2"x3".
I taped the patterned paper down onto the card. taped the pinstriped paper across the card, in the bottom half.
In the center of the pinstriped strip I taped down the burgundy strip of paper, and glued the vellum strip on top of that.
I Stamped a flower and 'thinking of you' onto the vellum rectangle, and adhered that to the burgundy rectangle, then taped that to the card.
I finished it by taking two self adhesive metal dots and putting them on either end of the stamped vellum rectangle. You could probably stress the edges of the vellum to give it a little more depth. But there you have it.
This card was actually made for this month when it was my turn to host- so of course I made treats too.
I made a three layer single tier red velvet cake, and I wanted to have it match with the card that we all made together.
I took the stamps that I used for the card and stamped them on a sheet of white paper, scanned it into the computer, enlarged the images, and printed it up. I transferred the pattern onto the cake using parchment paper and piping gel.
On the sides, I didn't want to try to copy the pattern off of the pink paper exactly, but I did something swirly and pink to give the same idea.
Then I made Bakerella cake balls with the scraps from the cake.

Tuesday, July 7, 2009

Mojo 94

I have made another Card for Mojo Monday.
Here is this weeks Sketch:


There is a lot of stuff on this card- so at first I was going to do something sort of monochromatic, like mostly black and white, with just one accent color in a few places, but I was looking through my pile of scrap that I save and decided to put these papers together and so I ended up with something more colorful.


I used matching Gel Pens to trace over parts of the stamps and draw "stitches" around the edge of the card.

Monday, June 29, 2009

CPS 122

Here's a card for this weeks sketch on CPS

Here's the Sketch for this week:
It's a pretty basic sketch, so I could do almost anything with it, But here's what I came up with:


Late CPS

This card is based on a Sketch from CPS, but I missed the deadline, but I am entering it for the blog Adriennes Sentiments
Anyway, here is the sketch:

Here's the stamp that I used- It has a flower in the middle and say many thanks around it, I stamped it once on the green paper, and twice on pink, then I cut the center flowers out of the pink paper and folded them slightly so the flower would have three layers to it.


And now here is the finished project:

Sunday, June 28, 2009

Window Card

Here is yet another card that I made for my cardswap.

First the cutting:
I cut pink card stock into pieces that were 5.5"x3.75" I folded it in half, and cut a 2.5" circle out of the center of one half of the card.
I cut a dotted patterned paper into 3.75" squares and cut a 2.5" circle out of the center.
I had a paper that had a grid pattern of squares and cupcakes on it, I cut it into strips, and cut the strips down so they had four squares each.
Last, I cut transparencies into squares that were about 3.5" (I just bought a box of overhead transparencies from OfficeMax

I stamped happy Birthday on the transparency with my Staz-on white ink, and then glued that down onto the front of the pink card.

I then taped down the dotted paper, lining up the circles. I also taped down the strips with squares and cupcakes along the edges of the card. Last thing, I just had to trim the extra paper around the edges.

Here's the final product, with the back half of the pink card showing through.

Tuesday, June 23, 2009

Free Stuff

There is a fun blogger who is giving away blog candy this month-- Check her out: Creative Card Corner

Go Check it out!

Midnight Madness 7

While I was making the card for MMSC6- I went ahead and followed the next sketch on Midnight Madness
Here is the sketch for challenge number 7

I rotated this one also, but the best part is that the little butterflies are multi-layered, so the top layer is 3D and popping off the card.

Midnight Madness 6

I made a card for the Midnight Madness Sketch Challenge again this week.
Here is the Sketch for week 6:
And here is what I made:


I rotated it obviously, but I really liked this sketch--the overlapping ribbons is very pretty

Sunday, June 21, 2009

Happy Fathers Day

So today during my sons nap I decided to make two cards for Fathers Day. I used two sketches from two different challenges for the inspiration.
The First was a Card I made for my Husband, it was based on the Sketch from Stamps and Smiles


Here's my card:

The next card I made was "from" my husband to my Father-in-law, I used the Sketch from Sunday Sketch and Stamp for this one:

My Stamps-- I was really limited, I need more stamps that are masculine, or at least neutral, rather than all the flowers and butterflies I have.

And the finished project.

Tuesday, June 16, 2009

Tip Junkie

It's a birthday bash at Tip junkie!


More give-aways everyday!!!!

Tie-Up Card

Here's a pretty, but basic little double fold tie up card
First off, I'll go with all of my cutting...
1- I cut Blue card stock into pieces that were 4"x8"
2- I cut some lightweight white paper into 3x3" squares.
3- I cut some textured white card stock into 3"x1.5" rectangles
4- I used the same blue Card stock and cut 1" squares.
5- I cut 9" lengths of a silky white ribbon, the ribbon is about 3/4" wide.


Instead of folding the card in half, I measured two inches in from each side of the blue card stock and folded each end in.
Then I taped the white square of paper into the center of the card.

I glued one end of a ribbon to the back of each of the textured 1.5"x3" rectangles, and then adhered them to the front of the card.

I then stuck 1" squares onto each side of the opening of the card.
Then, I tied the ribbon into a bow. This card was pretty easy to make and is nice and simple, but still pretty, and just a little bit different than the norm, since it opens in the middle instead of off to the side.


Friday, June 12, 2009

Did You Hear???

It's a Party!!!
One of my blogs that I follow (and love) is having a party to celebrate going to "dot-com"


Speaking of parties you have to check out the Tip Junkie blog if you haven't yet, lading up to her big bash she has posted SO MANY adorable ideas for party ideas and decor

Wednesday, June 10, 2009

flower hair clips

I've spent some time recently making hair clips for my little girl that should soon be making her debut in the world. I don't think people realize how easy and inexpensive it is to make hair clips and how versatile they can be, so I'm going to show how I made them.


I have several different kinds of clips that I have made, but right now I'm only going to show the clips I made using silk flowers.

Just go to your local craft store and find stems of flowers that you like and any ribbon to match; when you get home, you pull all of the flowers off of the stems, and remove any of the plastic "centers".


The clips I use are Conair, perfect shape and size for what I want


And the secret ingredient: cabinet lining. You can buy this in large amounts at any place like Bed Bath & Beyond.


See, you cut it into thin little 1" strips, and when you glue that inside the clip it will help "grip" the hair with out being uncomfortable


Once you've picked your ribbon and flower, you start by using your hot glue gun to glue the ribbon onto the hair clip.


Then take your flower(s) and glue them down one by one

I recommend always using more than one single flower, layering the flowers is just much prettier.

When You've got the flowers on, add something to the center, most often I use small jewels, but buttons, brads, beads, etc... will work
Then also glue the strip of lining inside the clip to finish it off.

Based on the size of your flowers, you may or may not see the ribbon that you use... so if you're using a small flower, be more careful matching the ribbon since it will be very visible:

Larger flowers cover the ribbon so you don't need to get as picky (there are a few very large flowers that I used no ribbon at all)

Monday, June 8, 2009

Midnight Madness #4

Another Challenge card this one is for Midnight Madness #4.
Here is the Sketch that they provided:

And here is what I came up with:


I know it's pretty basic, but I love, love, love pink and brown together, so for me it doesn't get much better than this!